In the world of design, architecture, and engineering, 3D visualization has become an essential tool for conveying ideas and concepts to clients, colleagues, and stakeholders. Making the most of this powerful medium requires an efficient and well-organized workflow. In this blog post, we’ll discuss several ways to optimize your 3D visualization process, covering everything from project organization to rendering techniques and collaboration tools.
Project Organization: Setting the Stage for Success
A well-organized project is the foundation of an efficient 3D visualization workflow. By establishing a clear structure and naming conventions for your files and assets, you’ll save precious time searching for the right resources and make it easier for team members to collaborate effectively.
File structure: Create a consistent folder hierarchy for your projects, with separate folders for models, textures, materials, and renders. This makes it easy to find and access the assets you need, while also keeping your project neat and organized.
Naming conventions: Consistent naming conventions are essential to avoid confusion and ensure that your files are easy to locate. Use descriptive names that include the asset type, version, and other relevant information (e.g., “Building_A_01.obj” or “Wood_Texture_02.jpg”).
Version control: Keep track of different versions of your models, textures, and scenes to easily revert to a previous state or compare different iterations. Use a version control system like Git, or simply add version numbers to your file names.
Modeling Techniques: Building a Solid Foundation
The quality of your 3D models has a direct impact on the realism and effectiveness of your visualizations. By employing smart modeling techniques, you can create high-quality assets without sacrificing efficiency.
Use the right tools: Choose a 3D modeling software that fits your needs and skill level. Popular options include Blender, 3ds Max, Maya, and SketchUp. Each has its own strengths and weaknesses, so experiment to find the one that works best for you.
Keep it clean: Clean and efficient geometry is crucial for a smooth 3D visualization workflow. Avoid overlapping faces, stray vertices, and unnecessary polygons. Use tools like the “Merge Vertices” and “Remove Doubles” functions to clean up your geometry.
Optimize for performance: High-polygon models can slow down your workflow and make it harder to navigate your scene. Use techniques like retopology and level of detail (LOD) to create optimized versions of your models that still maintain their visual fidelity.
Texturing and Materials: Bringing Your Models to Life
Realistic materials and textures are essential for creating convincing 3D visualizations. Invest time in crafting high-quality textures and materials to elevate the realism of your scenes.
High-resolution textures: High-quality textures are crucial for achieving photorealism in your visualizations. Use high-resolution images and seamless patterns to create realistic textures for your models. Websites like Texture Haven and CGTextures offer a wealth of free resources.
Physically-based rendering (PBR): PBR materials are designed to replicate the way real-world surfaces interact with light. Using PBR shaders and textures in your workflow can greatly enhance the realism of your visualizations. Most modern 3D software supports PBR workflows, so be sure to take advantage of this powerful technique.
UV mapping: Proper UV mapping is essential for ensuring that your textures display correctly on your models. Unwrap your models carefully to avoid stretching, distortion, and seams. Use software features like “Smart UV Project” or “UV Master” to speed up the process where appropriate.
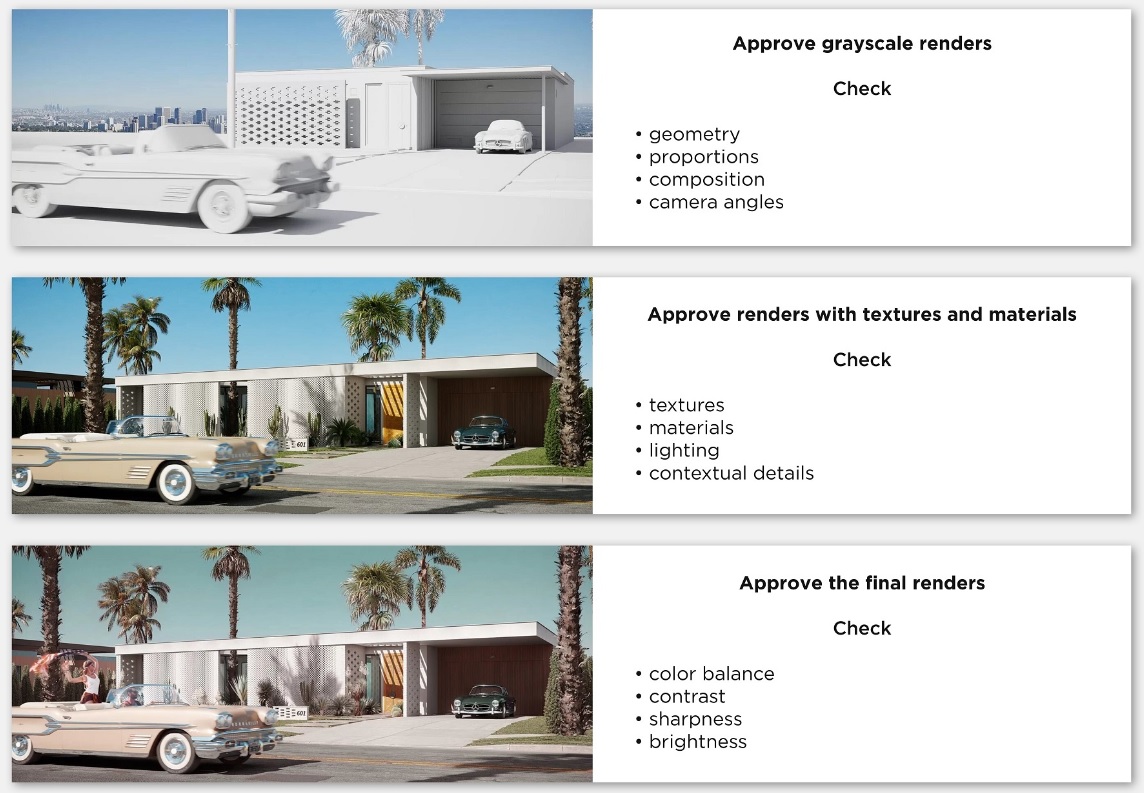
Lighting and Rendering: Capturing the Perfect Shot
Effective lighting and rendering techniques can make or break your 3D visualizations. By mastering these skills, you’ll be able to create stunning imagery that showcases your work in the best possible light.
Three-point lighting: The classic three-point lighting setup involves a key light, fill light, and back light. This versatile arrangement provides balanced, flattering illumination that can be adapted to suit any scene.
Global illumination: Global illumination (GI) algorithms simulate the way light bounces around a scene, creating soft shadows and realistic indirect lighting. While GI can be computationally expensive, it’s worth the investment for high-quality visualizations.
Render settings: Experiment with different render settings to strike a balance between quality and speed. Adjust settings like samples, resolution, and denoising to achieve the desired level of detail without sacrificing too much performance.
Collaboration and Communication: Working Together Efficiently
Effective collaboration is crucial for any creative team. By leveraging tools and techniques that streamline communication and feedback, you can ensure that your 3D visualization projects run smoothly from start to finish.
Project management software: Use project management tools like Trello, Asana, or Monday.com to track tasks, deadlines, and team communications. These platforms can help keep everyone on the same page andensure that progress is made efficiently.
File sharing and version control: Cloud-based storage solutions like Google Drive, Dropbox, or OneDrive make it easy to share files and collaborate on projects. Utilize file-sharing systems alongside version control to manage different iterations and prevent accidental overwrites or loss of work.
Real-time collaboration tools: Real-time collaboration tools like Sketchfab, Figma, or Miro can help bridge the gap between team members by allowing them to view, edit, and comment on 3D models and other assets simultaneously.
Virtual meetings: Regular virtual meetings using platforms like Zoom or Microsoft Teams can keep the lines of communication open and facilitate discussions, brainstorming sessions, and progress updates. This helps to maintain momentum and keep everyone engaged and accountable.
Constructive feedback: Encourage an open and supportive environment that welcomes constructive feedback. This fosters a culture of continuous improvement and helps team members refine their skills and create better visualizations.
By implementing these strategies and focusing on organization, modeling techniques, texturing and materials, lighting and rendering, and collaboration and communication, you can optimize your 3D visualization workflow. This will not only save you time and effort but also result in higher-quality visualizations that effectively convey your ideas and concepts to clients, colleagues, and stakeholders. Embrace these best practices and watch your 3D visualization projects soar to new heights.